

Want to talk it over? Don’t miss out on the Virtual Scoliosis Research Seminar covering this research Thursday, September 25th 2025 from 12-1:30 pm. You’ll get to ask questions and practice these exercises with Jennifer Stark, who wrote this blog. All are welcome. Whether you have scoli, are a movement practitioner with scoli clients, or are a parent of a child with scoli, this seminar will be beneficial for you.
Can’t attend live? No problem. A recording will be available for two weeks. Register here.
For years, Erin Myers and I have advocated that resistance exercises make our scoli bodies feel better than non-resistance exercises. We see this not only in our own bodies, but in how our clients’ bodies respond to our lessons. Up to this point, this advocacy has been supported by a qualitative feeling and a quantitative scoliometer measurement; there hasn’t been research that we could reference that was scoli-specific.
Spoiler alert: I finally found research that proves resistance exercises are helpful for scoli!
In August of 2024, a research team from Ankara, Turkey published an article titled Unraveling the Muscle Activation Equation: 3D Scoliosis-Specific Exercises and Muscle Response in Adolescent Idiopathic Scoliosis.1 The team’s goal was to specifically test if resistance exercises helped in thoracic and lumbar scoli erector spinae (the muscles that extend or arch your spine) muscle engagement.
This research is dense; it’s not easy to understand and ingest. We’re going to walk through it together, and at the end of this, I’m going to give you applicable resistance exercises to mix into your daily scoli care.
Navigate This Blog
Background
We know from previous research that there is a muscular asymmetry between the concave and convex muscles, with the convex side being more active. 2-5 We also know that the convex muscles being more active is a sign that scoli is going to increase.6 While researchers are still debating what comes first, the asymmetric muscle activation or the spinal curvature, we can work within our scope of practice and apply scoli-specific exercises to the concave and convex muscles appropriately in hopes of stabilizing and decreasing curvature.
Set-Up
24 adolescents with idiopathic scoliosis (AIS) with a mean age of 14.5 years and mean Risser sign of 3 participated in the study; this included 15 females and 9 males. All 24 participants had a double curve or “S” like curvature with Cobb angles between 10 and 20 degrees. 13 participants had an upper right thoracic curve, and the other 11 participants had an upper left thoracic curve. The median thoracic Cobb angle was 13.5 degrees, and the median thoracic axial vertebral rotation was 4 degrees. The median lumbar Cobb angle was 18.6 degrees, and the median lumbar axial vertebral rotation was 2 degrees.
The list of pathologies that lead to exclusion from the study is quite long:
- had undergone “major” surgery of any type
- had a scoli brace or planned to get one in the foreseeable future
- had any motor organ diseases
- had non-idiopathic scoliosis
- had juvenile or adult idiopathic scoliosis
- had a growth or developmental disorder
- had a history of nerve, muscle, and/or bone infections
- had psychological disorders
- had “obvious deformities of the lower limbs and feet”
Despite that list being aggressive to read, this allows the study to be targeted. Being able to rule out so many potential factors in the results is what brings validity to this research.
They used a Noraxon Ultium EMG (electromyographic) sensor system to compare muscle activation on the concave and convex sides of the spine, both in the thoracic and lumbar regions.7 If you want to understand the science behind the data collection, pages 2 and 3 of the article explain the frequencies used; however, suffice it to say they filtered through the collection to ensure that any outside inputs did not affect the readings. Electrodes were placed bilaterally (on both sides) at the following locations:
- the iliocostalis lumborum pars lumborum at L3
- the longissimus thoarcis at T9
- the iliocostalis lumborum pars thoracis at T10
All electrodes were aligned vertically with the posterior superior iliac spine (PSIS) and horizontally between the spinus process and the lateral-most palpable border of the erector spinae. These places were chosen in accordance to the guidelines provided by the Surface ElectroMyoGraphy for the Non-Invasive Assessment of Muscles (SENIAM).8
A Note on the Study Set Up
24 is a small population for a study; however, the researchers do not say how long the study lasted and the study was highly targeted in the requirements for entry. Either could be reasons for such a small population.
The Cobb angles included in the study were highly limited. Having data on a larger Cobb angle range would have been interesting to see if a larger Cobb angle had a greater discrepancy between the concave and convex sides.
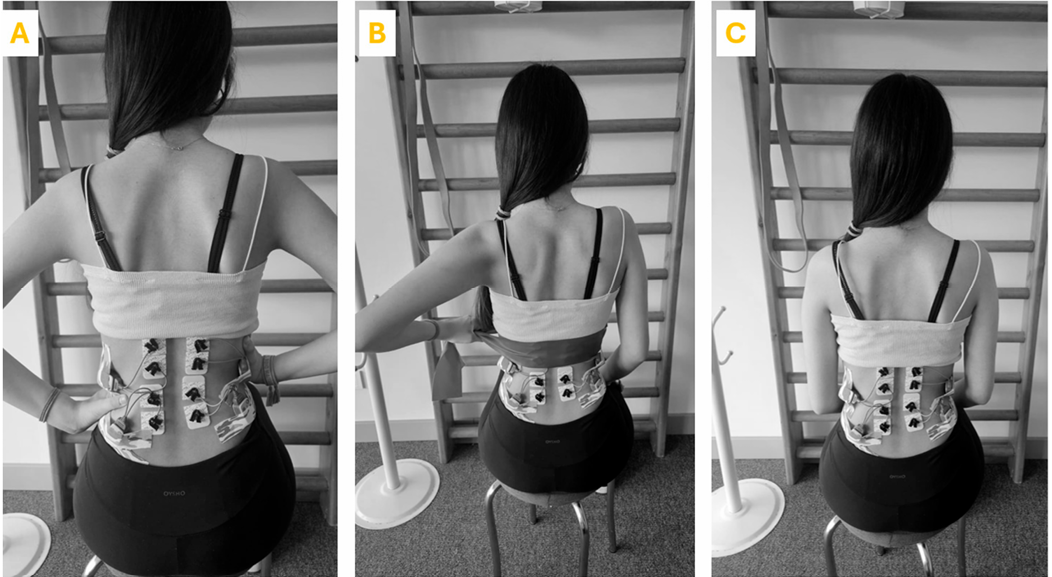
In Image A notice that there are 8 electrodes attached, despite researchers only listing the placement of 6. The researchers did not explain the location of the remaining two, but it appears they placed electrodes at L1. My assumption is that the two electrodes left out of the write-up are a control.
No electrodes were placed higher than T9. Anything higher up would be measuring the trapezius, which would be nice data to have but was not the goal of this study. The trapezius does attach at T12, but it isn’t wide enough at T9 to inhibit access to the erector spinae. (If you’re interested in learning how the muscles are layered, I encourage you to take Anatomy in Three Dimensions.)
Exercises
Prior to performing any of the three exercises from the study, participants were asked to do the following:
- seat themselves with their spine in a neutral position
- extend their spine (lengthening the torso and creating space between their vertebrae, specifically in the thoracic region)
- inhale from the convex side towards the concave side
- laterally shift their spine (towards the concave side – read more about this exercise in my last blog here)
- de-rotate their spine (concave areas backwards and convex areas forwards)
- perform any shoulder and/or pelvic adjustments needed to create further body symmetry
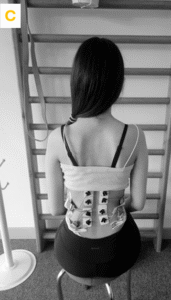
I would summarize this as self-correction; however, they define these six-ish exercises as the “3D protocol.” The 3D protocol is the basis of the three exercises included in the data collection. This is viewed in Image C below.
Data Collection Exercises
Once the participants understood their 3D protocol, they were asked to do the following three exercises.
- Perform the 3D protocol while applying manual resistance using hand rhythmic stimulation (Image A)
- Perform the 3D protocol with resistance from the concave side to the convex side utilizing a resistance band (Image B)
- Perform the 3D protocol and breathe (Image C)
Participants were given these exercises in a random order to avoid muscle memory and recency bias impacting the data. In an attempt to negate tiredness affecting the results, there were rest intervals of 30 seconds between repetitions and minute-long breaks between exercises. The researchers don’t tell us how many repetitions participants were asked to perform.
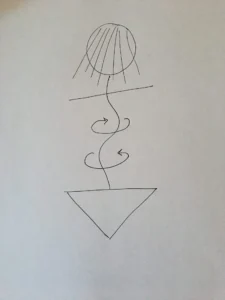
Image D shows a diagram sketch of the model from the study images; it also represents my client Natalie’s spine, which you’ll see referenced throughout the exercises. As my curves are different, I asked Natalie to be my model for clarity’s sake. Both the study model and Natalie have the stereotypical AIS curve pattern of upper right thoracic and lower left lumbar curves.
When it comes to exercise selection for the study, I don’t like all of the exercises. The 3D protocol is sound in self-correction. The researchers wanted data on how resistance increases muscle activity, but their selected resistance exercises don’t target the concave areas more than the convex areas. Because of this, I’ll be adding in some different exercises to try instead of theirs.
Exercise 1
Participants were asked to perform the 3D protocol while applying manual resistance using hand rhythmic stimulation.
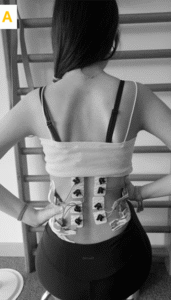
Your first question is probably, “What is hand rhythmic stimulation?” Even Google doesn’t know. I looked it up, hoping to find a specific definition, and was left wanting. My best educated guess from looking at Image A is that hand rhythmic stimulation in this case is applying pressure to the convex areas towards the concave areas, possibly pulsing that pressure.
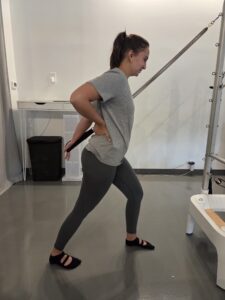
I often have clients self-correct and apply pressure to the convex sides of their curvature for assistance in self-correction. It’s a great exercise! However, if we think about this as a resistance exercise, like the researchers say they did, the model’s hands should be placed on her concave areas.
Look at Image E. Natalie’s hands are on her concave areas pushing her into her scoli, and she’s having to resist that pressure while attempting to shift out of her scoli. Super hard work!
The discrepancy here is a matter of intention. The exercises look very similar but are the exact opposite of one another. If you want to try self-correction with assistance, place your hands on the convex areas. If you want to try self-correction with resistance, place your hands on the concave areas.
Exercise 2
Participants were asked to perform the 3D protocol with “resistance from the concave side to the convex side” utilizing a resistance band.
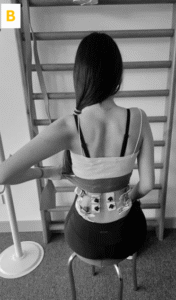
This exercise is also iffy for targeting scoli correction. This is a resistance exercise; the intention is to press into the band with the spine while holding the concave arm stable. In Image B, the resistance band is placed at the spot where her curves switch, so she’s at best pushing into the band and de-rotating her spine but shifting into her upper curve.
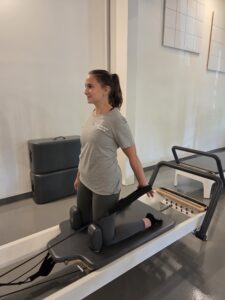
Instead, I would place the resistance band around the apex of the major curve as I have Natalie demonstrate in Image F. There are multiple ways to use a band for resistance in shifting out of your major curve; I picked this version so that nothing else was needed to complete the exercise.
- Wrap the resistance band around your body at the apex of your major curve (Natalie’s is her upper thoracic curve.)
- Perform the self-correction that the researchers call the 3D Protocol
- Externally rotate your humeral heads to pull on the band, as Natalie does in Image G
- Side shift into the band towards your concave side
I prefer to inhale into my side shift when doing this exercise and focus my breath into the band around my concave area. I specifically put the ends of the band in different hands so that this would be a resistance exercise without overtaxing the convex arm to stabilize the band.

Exercise 3
Participants were asked to perform the 3D protocol (self-correction) and breathe.
This is not a resistance exercise; it’s included as their baseline of muscular engagement. I would classify self-correction as “self-resistance.” The participants self-corrected and used their breathing to align themselves as best they could. I do this exercise with my clients regularly as it’s the basis of more difficult exercises.
A Note on the Exercise Selections
The researchers state that their target was spinal extensors, but they didn’t use the resistance in either Exercise 1 or Exercise 2 to target spinal extension. Exercises 1 and 2 also do not target the concave areas more than the convex areas. Spoiler alert: The lack of targeted resistance exercises makes the results much more impressive to me.
I imagine if they had selected better resistance exercises targeting the spinal extensors that we would have seen a greater discrepancy in the EMG measurements on each exercise. I would love to see research targeting muscle activation in exercises design to engage the concave muscles alone.exercise
I’ll walk you through three more scoli resistance exercises I regularly teach at the end of the blog.
Results
There are a few acronyms to know in order to understand the results:
- TES: Thoracic Erector Spinae
- LES: Lumbar Erector Spinae
- %MVIC: percentage of Maximal Voluntary Isometric Contraction
The first two are referencing different sections of the erector spinae group of muscles: thoracic and lumbar. Maximal Voluntary Isometric Contraction, in layman’s terms, means the most a muscle can work without having to lengthen or shorten when asked to work. %MVIC is the unit of measurement for the EMG machine.
Thoracic Measurements
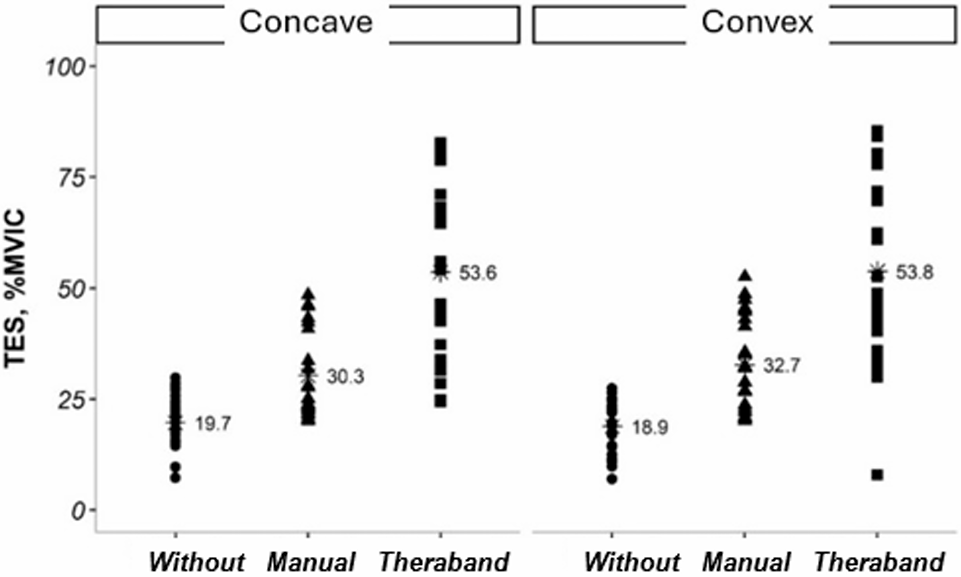
Without is Exercise 3, the exercise that does not include resistance. The thoracic concave side worked 0.8 %MVIC more than the thoracic convex side, which is the opposite of what we would normally expect. This is the only exercise where this happened. This means that self-correction alone was activating the concave area more than the convex, which is pretty awesome!
Manual is Exercise 1, the resistance exercise using hands as resistance. The thoracic convex side worked 2.4 %MVIC more than the thoracic concave side. The thoracic concave side engagement increased 10.6 %MVIC, and the thoracic convex increased 13.8 %MVIC. This makes sense as the convex side is the side that chronically works harder.
Theraband is Exercise 2, the resistance exercise using a resistance band as resistance. The thoracic convex side worked 0.2 %MVIC more than the thoracic concave side, which is remarkably even engagement. In comparison to Without/Exercise 3, the thoracic concave side engagement increased 33.9 %MVIC, and the thoracic convex increased 34.9 %MVIC. In comparison to Manual/Exercise 1, the thoracic concave side engagement increased 23.3 %MVIC, and the thoracic convex increased 21.1 %MVIC. This, again, makes sense as the convex side is the side that chronically works harder.
Lumbar Measurements
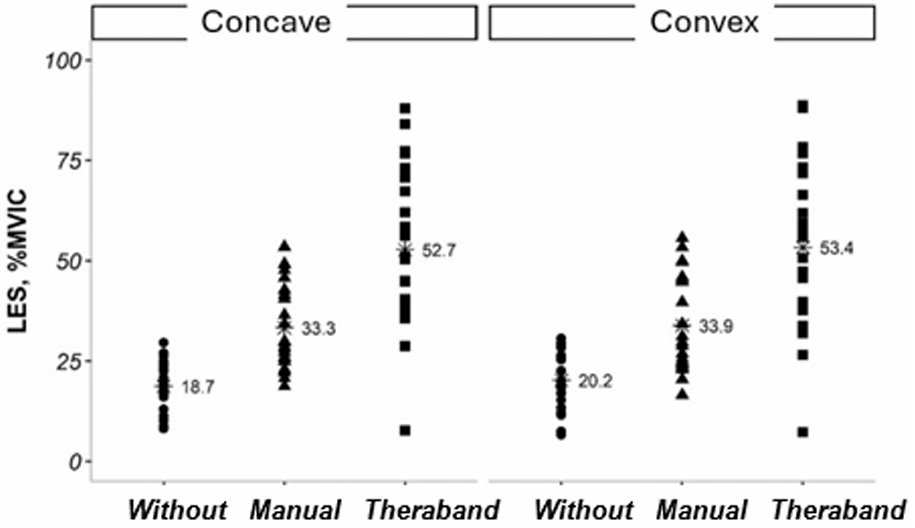
Without is Exercise 3, the exercise that does not include resistance. The lumbar convex side worked 1.5 %MVIC more than the thoracic concave side.
Manual is Exercise 1, the resistance exercise using hands as resistance. The lumbar convex side worked 0.3 %MVIC more than the lumbar concave side, which is remarkably even engagement. The lumbar concave side engagement increased 14.6 %MVIC, and the thoracic convex increased 13.7 %MVIC. This is great for engaging the lumbar concave area without overworking the lumbar convex area.
Theraband is Exercise 2, the resistance exercise using a resistance band as resistance. The thoracic convex side worked 0.2 %MVIC more than the lumbar concave side. In comparison to Without/Exercise 3, the thoracic concave side engagement increased 34 %MVIC, and the thoracic convex increased 33.2 %MVIC. In comparison to Manual/Exercise 1, the thoracic concave side engagement increased 19.4 %MVIC, and the thoracic convex increased 19.5 %MVIC. The increase in engagement from Manual/Exercise 1 to Theraband/Exercise 2 is insanely similar.
Explanation of Results
Across the board, the difference in engagement between concave and convex, thoracic and lumbar, and each of the three exercises (resistance exercise or non-resistance exercise) is marginal at best. This means that all muscles respond to resistance, which is fabulous for concave muscles but maybe not awesome for convex muscles. Take into consideration what resistance exercises you choose to perform to target those sleepy concave muscles.
As expected, increasing resistance increased the muscular engagement. Manual/Exercise 1 almost doubled muscular engagement in comparison to Without/Exercise 3 in all 12 categories. Theraband/Exercise 2 more than doubled muscular engagement in comparison to Without/Exercise 3 and increased between 57% (lumbar convex) and 76% (thoracic concave) in comparison to Manual/Exercise 1.
Conclusions
Reasons you should be doing resistance exercises for your scoliosis management:
- Effectiveness: Resistance exercises engage muscles more than non-resistance exercises.
- Efficiency: If you are limited in your time allotted to your scoli exercises, selecting exercises intelligently to ensure concave musculature engagement is pivotal.
- Accessibility: Resistance exercises do not require equipment, so you don’t have to buy anything to do them. You can do them anywhere.
Resistance exercises, as proven by this study, can quickly and fully engage your sleepy concave muscles. Using resistance exercises to target concave muscles is what we do at Spiral Spine.
While you don’t have to own any equipment to perform resistance exercises, you can purchase some inexpensive props for greater effectiveness and efficiency. If you’re interested in making any small or large equipment purchases, Erin has compiled a list of her favorites and has an exclusive discount code for Pilates equipment.
The moral of the story is that the more resistance, the more the muscle works, even if you don’t do the exercise perfectly. This is permission to give yourself some grace while working out, whether that be at home, the gym, or a Pilates studio.
Scoli Resistance Exercises
Resistance exercises targeting concave muscles are the core of what we do at Spiral Spine. We’re Pilates instructors; muscles are our thing. The following are examples of scoli resistance exercises that I regularly teach my clients in the studio and online using various amounts of equipment.
No Equipment Reqired Exercise
All you need is a wall. Most of us have access to a wall or some immovable surface. This exercise targets thoracic scoli curves.
- Stand with your concave arm facing the wall (make sure your close enough for your arm to touch the wall without being locked straight)
- Press as hard as you can into the wall (even if it pushes you into your curve, like it does to Natalie in Image I)
- Keeping the pressure in the concave arm shift your spine towards the concave areas (like Nataalie does in Image J)
- Hold for a large exhale
- Release as you inhale and relax

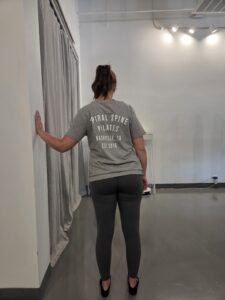
This exercise is an intense engagement of the concave area, and not all of my clients like it. Those who like it love it, though. I normally have someone do anywhere from 3-8 repetitions of this exercise.
Resistance Band Reqired Exercise
For this exercise, you’ll need at least a resistance band either tied to something, locked in place (like in a door jam), or looped around something. I’m having Natalie demonstrate this on the Tower, but you could also perform this exercise on a Cadillac or with a MOTR.
This exercise targets the thoracic concave area in combination with the lumbar concave area.
- Stand in a lunge with the foot on the side of your lumbar concave area behind you (Natalie’s lumbar concave is her right side, so her right foot is back in Image K.)
- Self-correct out of your scoli
- Exhale and pull the resistance band/spring behind your body, keeping your arm elongated but not hyperextended (Image L)
- Inhale and resist the band/spring pulling your arm forwards
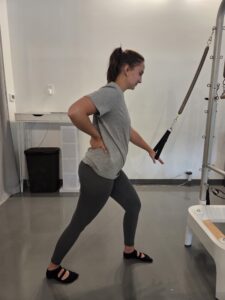
I normally have clients do 6 repetitions of the exercise, then do different arm movements in the same set-up.
Reformer Required Exercise
I’m a Pilates teacher, so we’re going to use a Reformer, specifically the Allegro 2. There are too many exercises that I can choose from, so I selected the one that looks the most similar to the other exercises in order to explain why the Reformer is more effective.
This exercise targets thoracic scoli, while making your core fight to stabilize you on the carriage. Because of the carriage movement forward and back in space, you’ll need to self-correct out of your scoli and maintain core engagement to not wobble and fall over as you press your arm back. The most difficult time in the exercise to stabilize is when your arm stops pressing behind you to return to the front.
- Set the spring resistance to one blue spring (or one medium spring if you aren’t using a Balanced Body Reformer)
- Kneel with your knees pressed against the shoulder blocks facing the straps (Yes, you have to put your knees against the blocks for safety! If you feel unstable, you can create a tripod by touching your feet together or sit on a long box or in criss-cross-apple-sauce.)
- Hold the strap on the concave arm side (Your convex arm can either be at rest like Natalie’s in Image M or make the Schroth teacup handle to help the convex scapula not wing as much.)
- Self-correct out of your scoli
- Exhale and pull the strap behind your body, keeping your arm elongated but not hyperextended (Image M)
- Inhale and resist the strap pulling your arm forwards to control the carriage’s return to the stoppers
I normally have clients do 6 repetitions of this exercise, then do different arm movements in the same set-up. This is a very similar exercise to the Tower exercise above, just more difficult for your core to navigate.
If you’re interested in how to select appropriate resistance exercises for your body or your client’s body. Don’t fear! There are many ways to consult Spiral Spine on selecting exercises:
- book a lesson with me or another instructor at Spiral Spine in studio or online
- sign up for our online streaming platform Spiral Spine On Demand
- read Analyzing Scoliosis or I Have Scoliosis; Now What?
- follow us on social media for our latest tips and tricks: Instagram, Facebook, YouTube
- sign up for our newsletter (you’ll be alerted to any new educational resources like blogs, videos, and workshops)
- register and attend the Scoliosis Retreat at the studio
Review all included exercises and more during the Virtual Scoliosis Research Seminar covering this research Thursday, September 25th 2025 from 12-1:30 pm. You’ll get to ask questions and practice these exercises with Jennifer Stark, who wrote this blog. All are welcome. Whether you have scoli, are a movement practitioner with scoli clients, or are a parent of a child with scoli, this seminar will be beneficial for you.
Can’t attend live? No problem. A recording will be available for two weeks. Register here.
References
- Haksever, B.; Soylu, C.; Demir, P.; Yildirim, N.U. Unraveling the Muscle Activation Equation: 3DScoliosis-Specific Exercises and Muscle Response in Adolescent Idiopathic Scoliosis. Appl. Sci. 2024, 14, 6984. https://doi.org/10.3390/app14166984 (see the bottom of this page for the PDF)
- Wilczy´nski, J.; Karolak, P. Relationship Between Electromyographic Frequency of the Erector Spinae and Location, Direction, and Number of Spinal Curvatures in Children with Scoliotic Changes. Risk Manag. Healthc. Policy 2021, 14, 1881–1896. https://pubmed.ncbi.nlm.nih.gov/34007226/
- Avikainen, V.J.; Rezasoltani, A.; Kauhanen, H.A. Asymmetry of paraspinal EMG-time characteristics in idiopathic scoliosis. Clin. Spine Surg. 1999, 12, 61–67. https://doi.org/10.1097/00002517-199902000-00010
- Kwok, G.; Yip, J.; Cheung, M.-C.; Yick, K.-L. Evaluation of myoelectric activity of paraspinal muscles in adolescents with idiopathic scoliosis during habitual standing and sitting. BioMed Res. Int. 2015, 2015, 958450. https://doi.org/10.1155/2015/958450
- Cheung, J.; Halbertsma, J.P.; Veldhuizen, A.G.; Sluiter, W.J.; Maurits, N.M.; Cool, J.C.; van Horn, J.R. A preliminary study on electromyographic analysis of the paraspinal musculature in idiopathic scoliosis. Eur. Spine J. 2005, 14, 130–137. https://www.ncbi.nlm.nih.gov/pubmed/15368104
- Elattar, E.A.; Saber, N.Z.; Farrag, D.A. Predictive factors for progression of adolescent idiopathic scoliosis: A 1-year study. Egypt. Rheumatol. Rehabil. 2015, 42, 111–119. https://doi.org/10.4103/1110-161X.163943
- Learn more about the equipment used to measure muscle activity here: https://www.noraxon.com/our-products/ultium-emg/
- Learn more about the guidelines for placing electrodes during muscle testing here: http://www.seniam.org/

Jennifer Stark is a Nationally Certified Pilates Teacher, Certified Integrated Movement Specialist, Certified Kinesiology Taping Practitioner, and Scoliosis Educator. She has worked alongside Erin Myers on multiple scoliosis education endeavors, including Analyzing Scoliosis, I Have Scoliosis; Now What?, and the Scoliosis Retreat. As of 2024, only 4% of the data available to read about scoli is written at a level where the general population can understand.* In an attempt to combat that statistic, Jennifer regularly writes blogs based on research and offers Virtual Scoliosis Research Seminars to help educate and empower the scoli community.