
The side shift exercise dates back to the early 1980s when Dr. Min Mehta (an orthopedic surgeon who was diagnosed with AIS at age 11) presented her “Active correction by side shift: an alternative treatment for early idiopathic scoliosis” in 1983 and was published in 19851. This absolute gem seems to be referenced in almost all research on the side shift exercise, but it is unfortunately lost aside from citations inside random online posts and dry research papers. If someone finds her research, we’d love to see it!
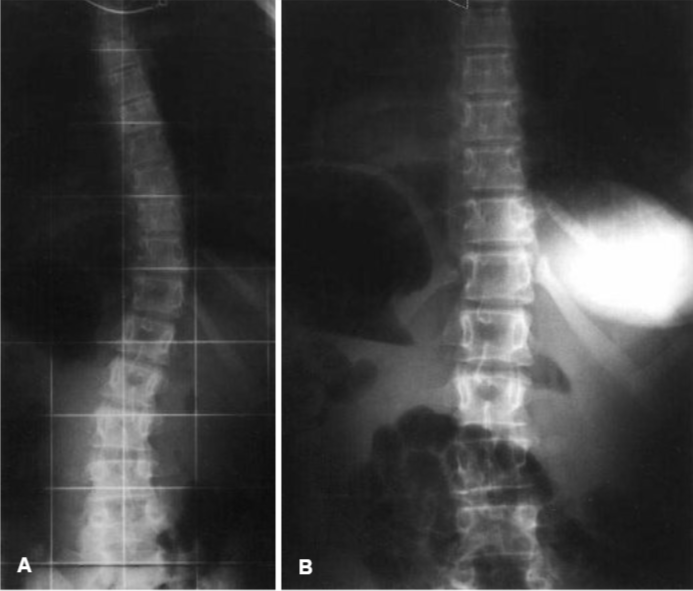
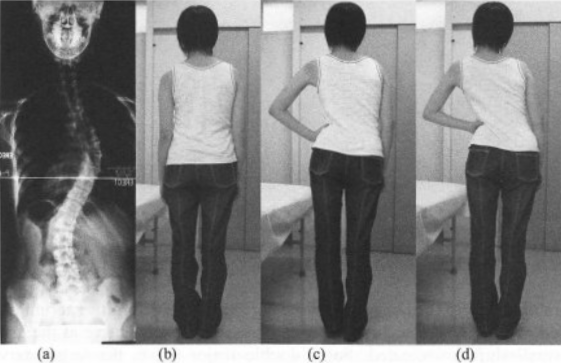
The following image is an x-ray comparison of a 14-year-old female’s spine before and during the side shift exercise from a 1999 side shift study from the Netherlands. Before (Image A), her Cobb angle is 32 degrees. During (Image B), her Cobb angle is 8 degrees.2
Three years after Dr. Mehta’s presentation, Drs. Maruyama, Takeshita, and Kitagawa of Japan adopted her exercise along with the hitch exercise (similar spinal motion to wearing a shoe lift, which we’ll cover later). They wrote about their findings in 2008 after spending 22 years working with patients.3
Admittedly, the write-up of this study leaves much to be desired; of the 7 research references, the authors reference themselves and their former findings twice. This is one study amongst many for the lead researcher, Dr. Maruyama. They don’t fill their research articles with data, which is what I normally prefer. I have questions but find this study valid based on other correlating research. That’s why we’re talking about more than one research article regarding the side shift exercise.
The Set-Up
Patients were separated into two groups.
Group 1 consisted of 69 Idiopathic Scoliosis patients who started treatment after skeletal maturity; defined as the patients who fell into one of the following: a Risser sign IV or V or were post menarche by 2 or more years.
Group 2 consisted of 39 Adolescent Idiopathic Scoliosis patients who started treatment before skeletal maturity; defined as the patients who fell into one of the following: a Risser sign of 0, I, II, or III or a Cobb angle greater than 25 degrees.
Four items to point out:
- The researchers tell us that the patients forming Group 2 were only female, so we can infer that Group 1 consisted of male and female patients.
- Group 1 is listed as having Idiopathic Scoliosis, unlike Group 2’s Adolescent Idiopathic Scoliosis, so we can infer that Group 1 consists of patients with Infantile, Juvenile, or Adult Idiopathic Scolioisis. As the average age at the onset of treatment in Group 1 was 16.3 years of age, younger adult patients were probably included with children of various ages.
- The researchers go out of their way to include that they treat those with curves too small to brace (defined as a Cobb angle of less than 25 degrees), but they do not specifically place these patients into one group or the other.
- With 22 years of using the side shift as treatment, you would think these doctors would have had a larger population to use for the study. Group 1 has 69 participants, and Group 2 has 39 participants. 108 participants is a decently sized study; however, we always want the largest amount possible for validity.
The Exercises
Only three exercises were included in this study: the side shift, the hitch, and the hitch-shift (a combination of the first two exercises). All three of these exercises are accessible to those with mobile spines. If you’ve had a non-mobile surgery (like a fusion) or have a pathology that negates lateral spinal movement (like a disc buldge), these exercises are not for you. There are other exercises for you, but the researchers did not cover those exercises.
The Side shift
A side shift is similar to italicizing the letter “I”. For example, if a curve looks like “(” a side shift would look like “I“. You can see this in Figure 1’s far-right image.
Patients were instructed to laterally shift their spines towards the concave side of their major curve. Those with multiple curves only applied the side shift to their major or largest curve. They noted that depending on whether C7 (the lowest cervical vertebra) fell on the convex or concave side of the major curve indicated if a large or small shift was taught respectively.
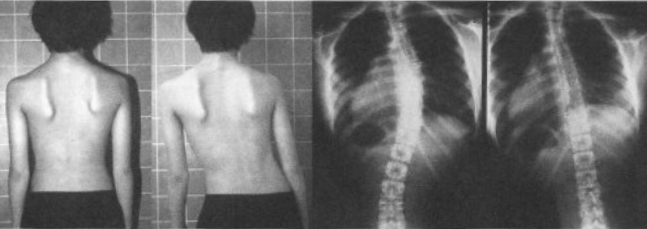
See Figure 1 from the research. Can you see how the patient’s spine comes out of the curve when he shifts to his concave side? While it’s not the focus of the exercise, you can also see how his scapulae even out slightly.
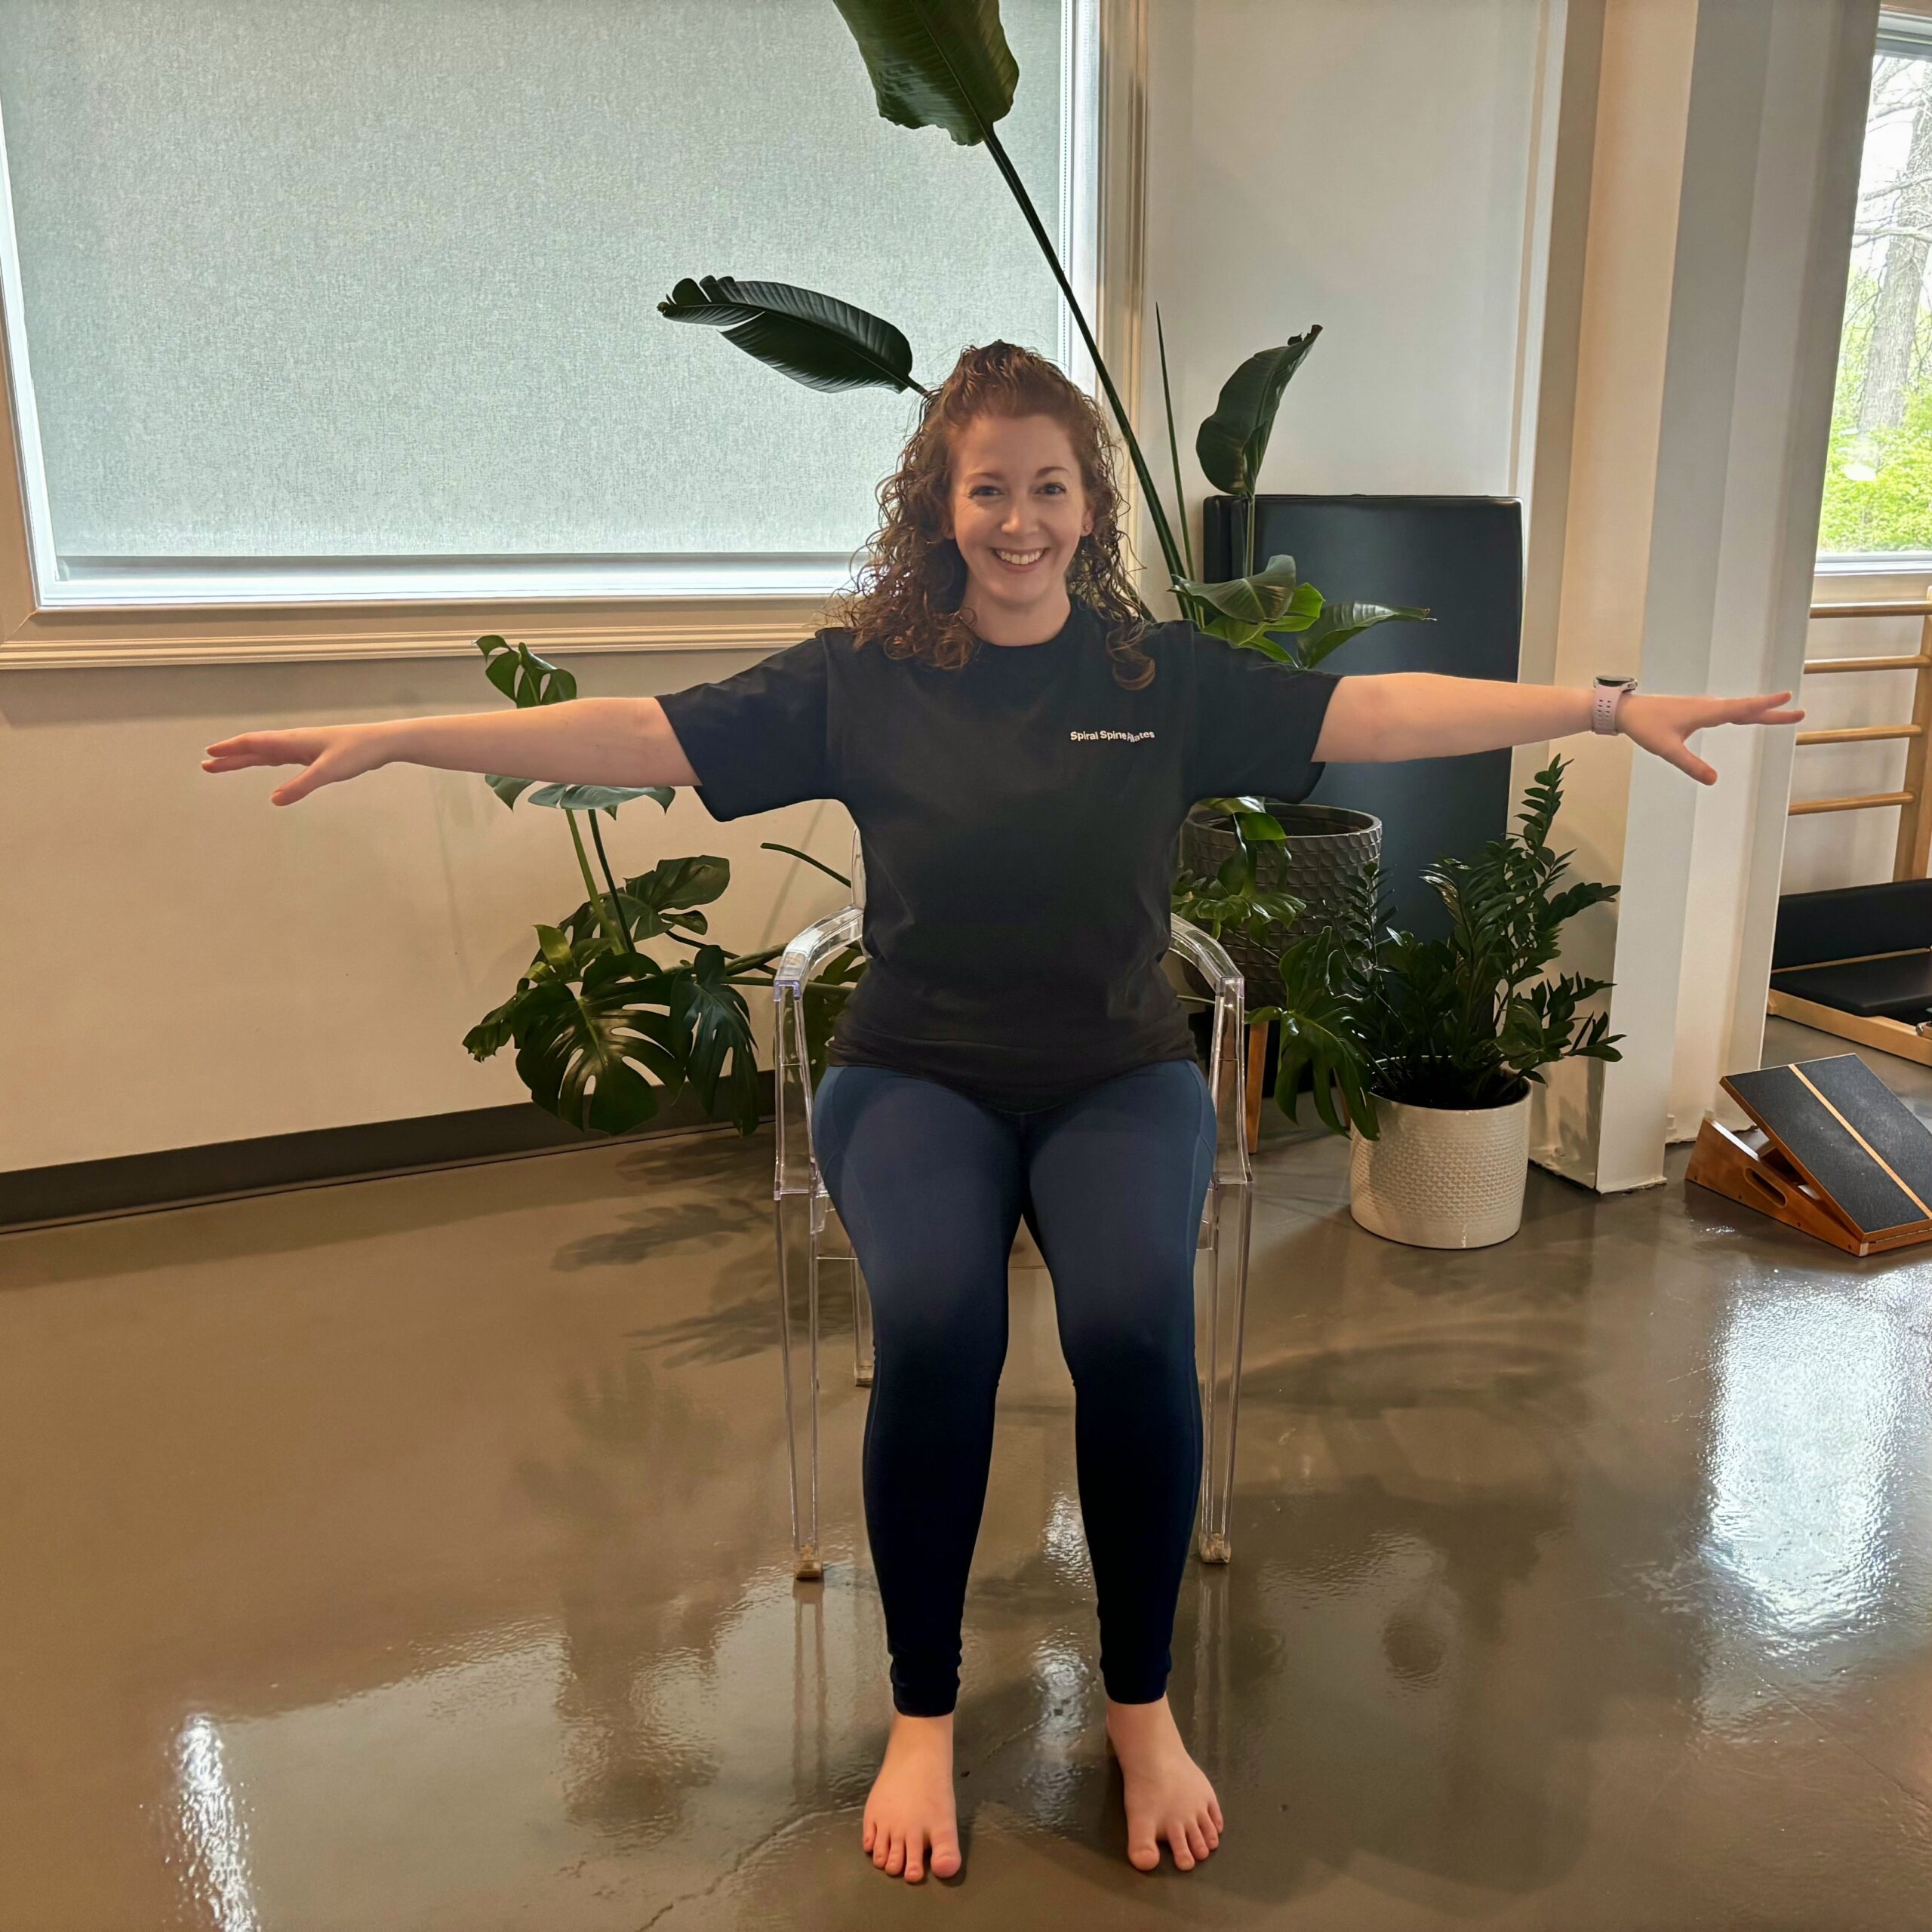
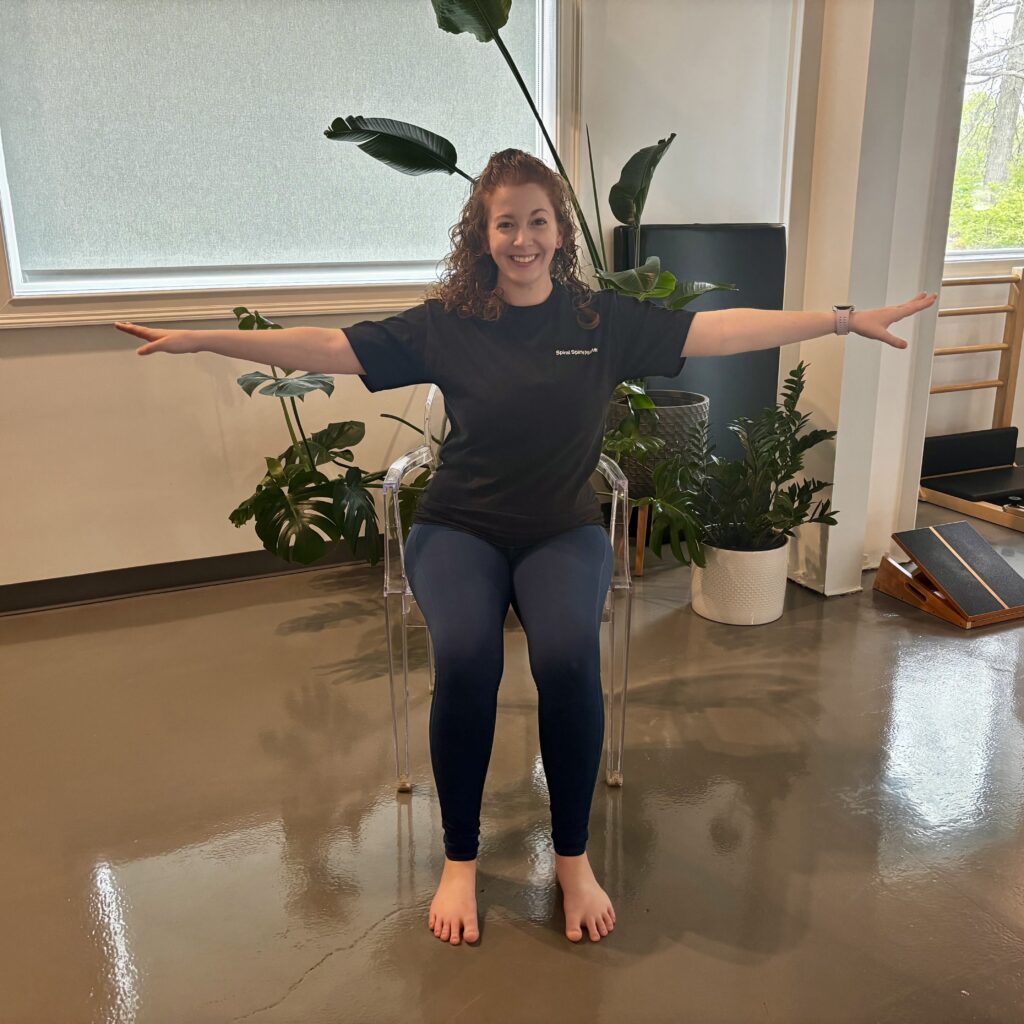
If the side shift is accessible to your body, let me cue you through the exercise:
- Seat yourself in a place where your feet touch the floor and you can find even weight between your sit bones.
- Hold your arms out long parallel to the ground making the letter “T”.
- Keep your arms and shoulders as parallel to the ground as possible while you think about becoming a typewriter at the apex of your major curve, sliding your concave area away from the convex area.
- Move as far as you feel comfortable without changing the even distribution of your weight on your sit bones.
Note: I prefer to exhale as I shift and inhale as I return, but there’s not a right or wrong way to breathe here. Play around with what your body and brain prefer.
Almost all of my clients can do the side shift and adore the movement! I give this exercise to all of my clients with mobile spines, myself included. While the exercise is to overcorrect, the idea is that over time your natural state will be able to shift out of your curve more comfortably and often.
The Hitch
While everyone performed the side shift, the researchers specifically assigned the hitch exercise to those with thoracolumbar and/or lumbar curves. Patients were instructed to lift their heel by pulling their iliac crest upwards resulting in a side bend towards the convex side of their curve.
Look at Figure 2. Image B shows how she regularly stands. Image C shows how she side shifts towards the concave side. Image D shows how she performs the hitch exercise.
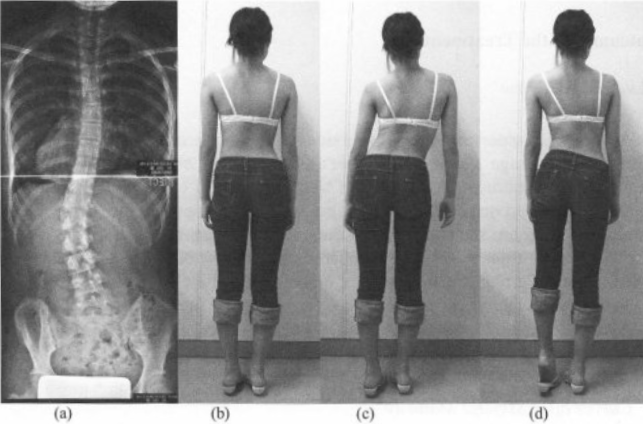
Figure 2 Image D shows that while her trunk is closer to the plumb line, with her head and ribs over her sacrum, her pelvis is laterally tilted to her right side significantly. This brings up a question that gets asked a lot: wouldn’t a shoe lift help?
This exercise looks like it can be accomplished by wearing a shoe lift; however, this is not the same as wearing a shoe lift. If you were to walk about with your convex muscles that are currently long and overworked smooshed shorter while overworking resulting in extremely painful spasms. Ask the clients we’ve seen that have tried it. Even if your pelvis is not perfectly balanced, you do not need a shoe lift unless you have a leg length discrepancy. Unbalancing a fairly balanced pelvis is adding fuel to the fire that is an already complex scoli situation.
That being said if you have a diagnosed leg length discrepancy and have not had a non-mobile surgery, use a shoe lift! You’re the shoe lift lovers of the world.
Whether my clients’ bodies or my body likes the hitch exercise honestly depends on the day. My favorite variation is to use the bottom step of a staircase so that you have negative space to work with and a handrail for balance support.
If a large lateral lumbar motion is accessible to your body, try what I call hip dips:
- Stand on a stair tread (or similar object) while holding onto the rail for support.
- Wiggle one foot close to the edge of the step and float the other in the space to your side at the same level.
- Exhale, passively lower your floating leg by allowing your pelvis to tip to the side. I always feel like my floating foot gets heavy and pulls down on my hip.
- Inhale, push into your stable foot and leg to return your pelvis to neutral.
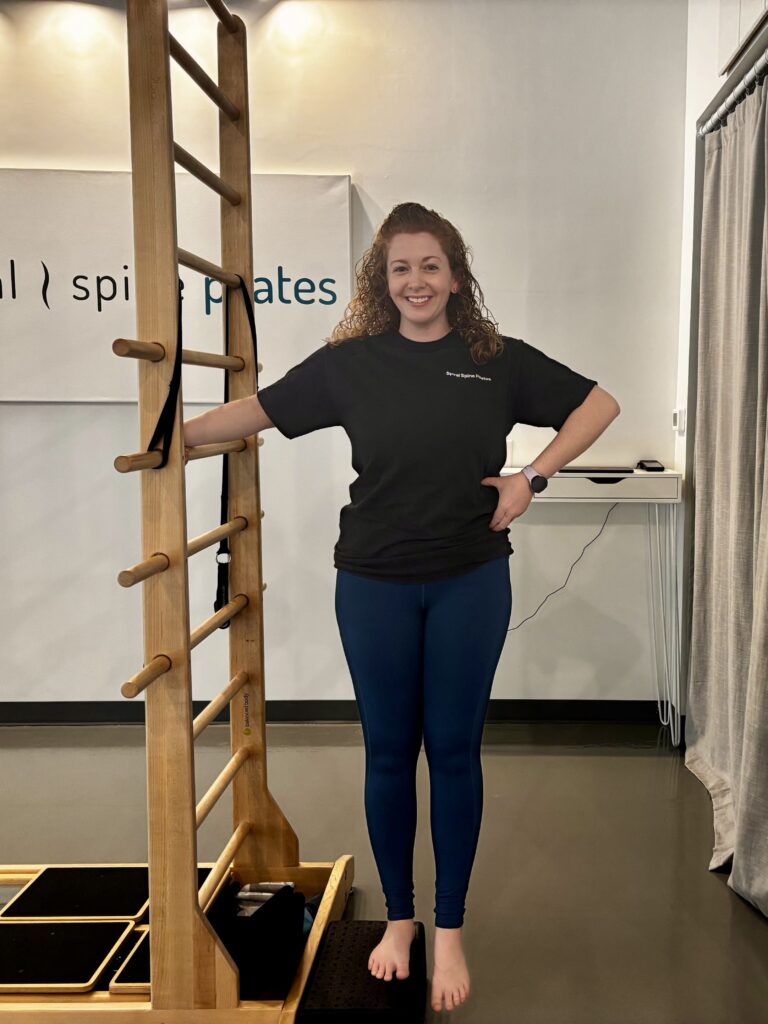
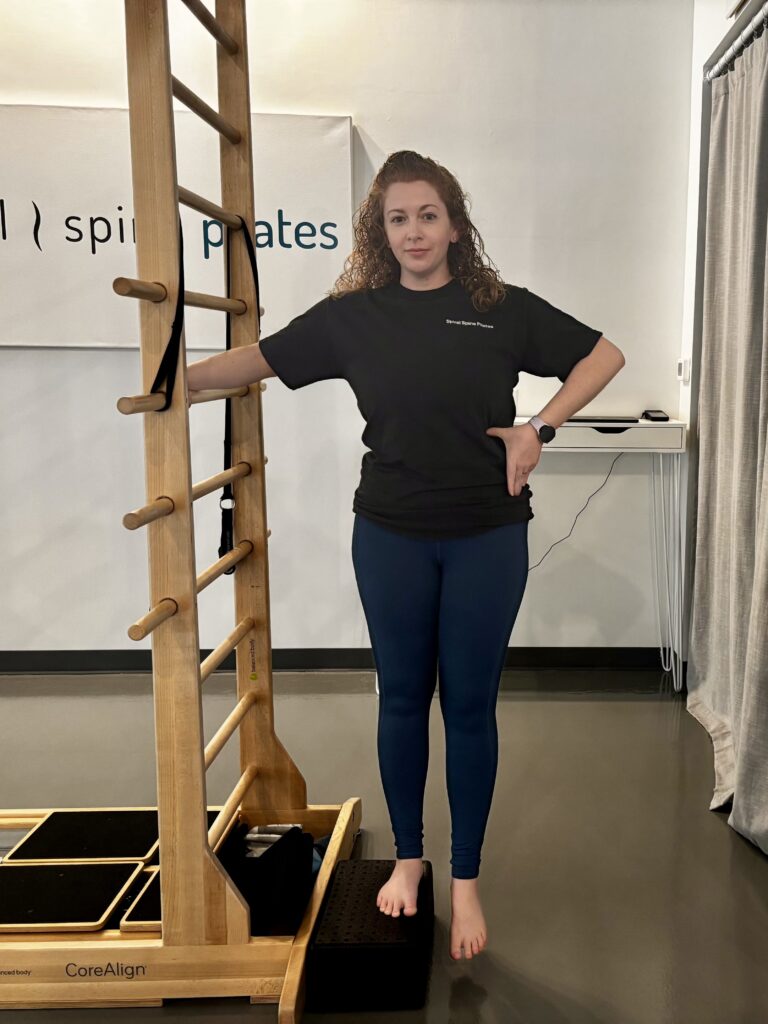
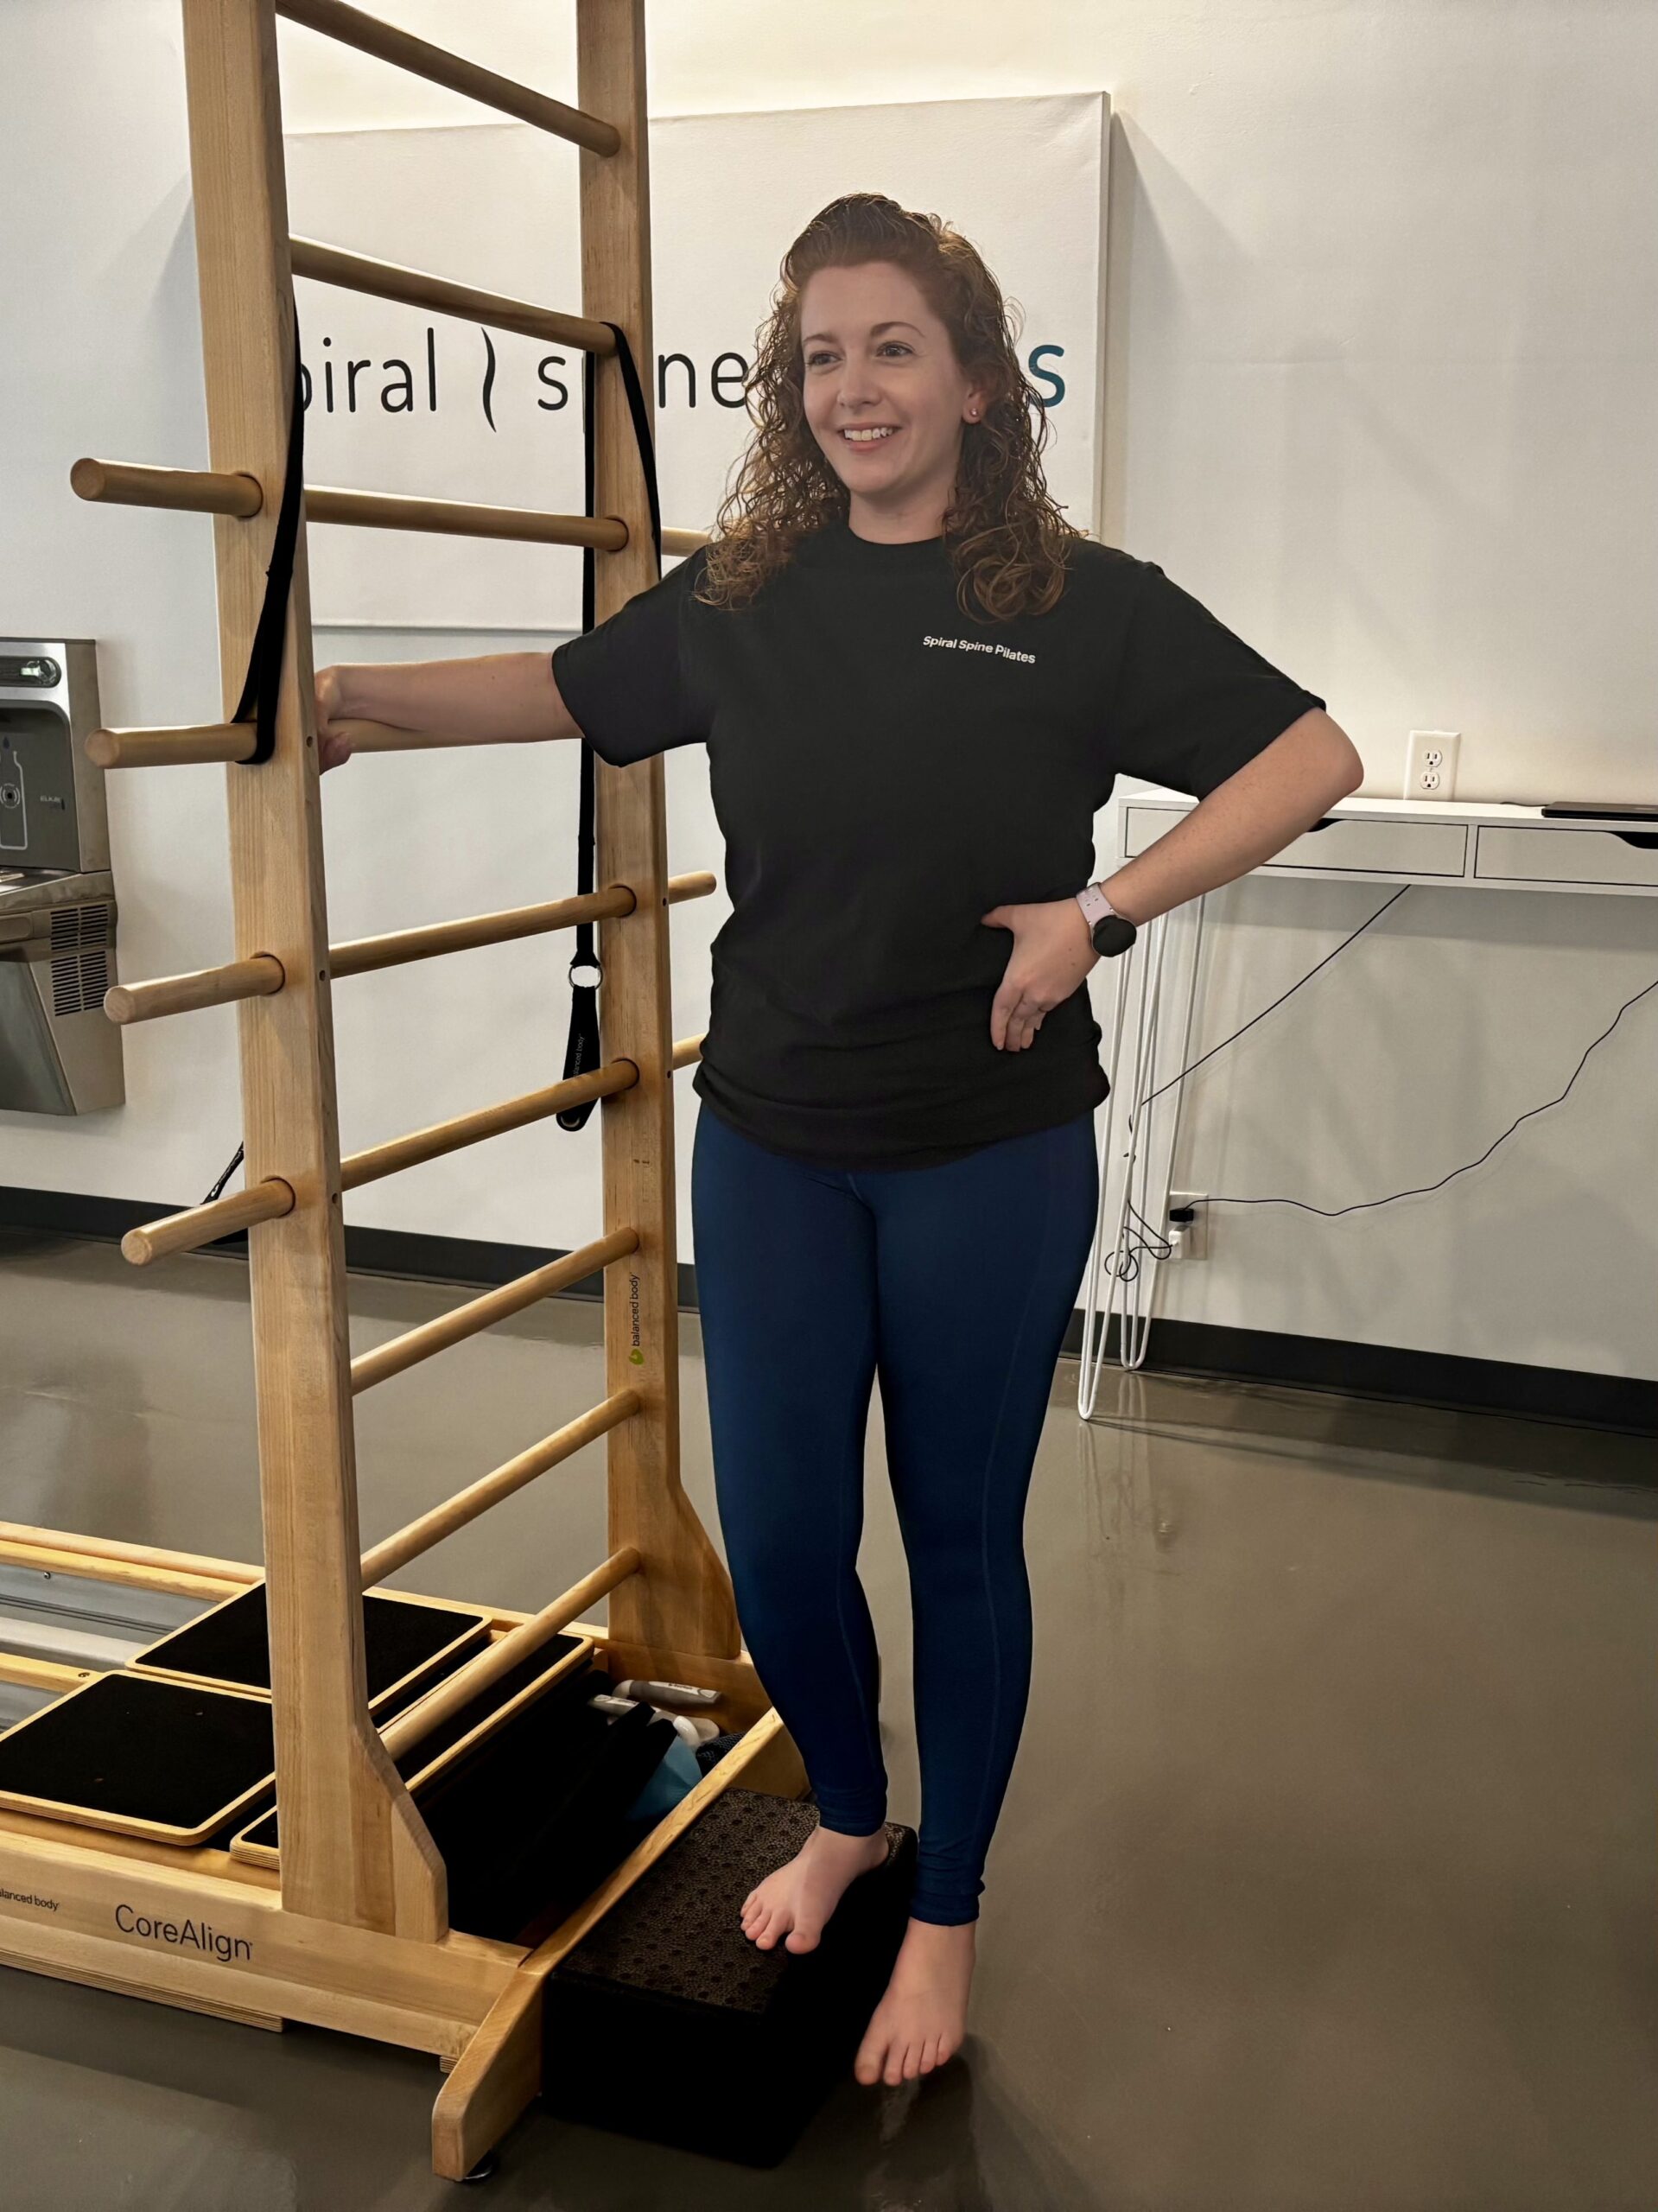
Notice in the images of me doing this exercise that my thumb is on my last rib and my middle finger is on my hip bone. I do this to ensure good movement. Also note that my body does not shift to the right or left, only my pelvis sinking down.
I actually do this exercise on both sides, which might not be a great choice for your body. I often train my clients depending on their bodies to sink into their scoli and fight out of it.
When my lumbar concave side is floating, I get a gigantic stretch in the concave area as my leg lowers. My psoas, iliacus, and obliques all get to lengthen out amazingly. I teach Mermaid on the Chair similarly with one hip off of the seat because the stretch feels so good!
When my lumbar convex side is floating, I honestly don’t get a whole lot of sensation. I have an odd firing pattern where my lumbar concave and sleepy glutes are on opposite sides. All of my clients whose lumbar concave and sleepy glutes are on the same side feel a ton of work stabilizing their pelvis in the sagittal and transverse planes while letting it navigate the frontal plane.
Try it out on both sides and see what your body thinks!
If lateral lumbar motion is not accessible to your body, try a similar exercise I teach in conjunction with hip dips:
- Stand on a stair tread (or similar object) while holding onto the rail for support.
- Wiggle one foot close to the edge of the step and float the other in the space to your side at the same level.
- Exhale, lower your floating leg by bending your stable leg’s knee. How far can you move without letting your spine sink into your scoli?
- Inhale, push into your stable foot to straighten your stable leg and return your floating leg to hover in alignment.
I love this exercise as a way to work on balance and keep from sinking into my scoli in awkward positions. It’s such a functional movement to isolate knee movement! For example, how often do you get distracted going up the stairs and have to step side-ways?
The Hitch-Shift
If a patient had two curves that were very similar in size, the researchers combined these two exercises. See Figure 3 from the research. Patients were instructed to perform the hitch for their lumbar curve and then push their hand into the lumbar convex area (Image C) to stabilize the hitch while shifting towards the thoracic concave area (Image D).
This is easier said than done. Any time I’ve had a client attempt this, their bodies don’t quite understand what’s going on. In the end, neither exercise gets executed fully. There’s actually some research that backs up my findings; we’re going to look at a study from Brazil.4
January to March 2016, four doctors and a graduate student at São Paulo State University combined the use of shoe lifts and the side shift exercise. I’ll quickly explain how detailed they were. They only allowed subjects with thoracic right and lumber left curves to participate and took the following measurements:
- No shoe lift standing normally
- No shoe lift shifting right
- No shoe lift shifting left
- 1 cm right shoe lift shifting right
- 1 cm right shoe lift shifting left
- 1 cm left shoe lift shifting right
- 1 cm left shoe lift shifting left (the hitch-shift exercise from above at a lower lift level)
- 3 cm right shoe lift shifting right
- 3 cm right shoe lift shifting left
- 3 cm left shoe lift shifting right
- 3 cm left shoe lift shifting left (the hitch-shift exercise from above at a higher lift level)
They measured four angles along the spine for reference in each position: T2-T6, T6-T10, T10-L2, and L2-S1. They found that performing the side-shift in conjunction with the shoe lift no matter the side was less effective than simply using the shoe lift without the side-shift. This confirms what I’ve seen in my work at the studio that the hitch-shift isn’t the best exercise if you’re trying to target both curves at once.
If you’ve taken a lesson from me, you know I’m all about hitting each curve in one exercise. I find a similar effect to what the researchers wanted from the hitch-shift can be found by padding up while side-lying on the lumbar convex side and then doing a side-bend thoracically or padding up while side-lying on the thoracic convex side and then doing a side shift thoracically, amongst others.
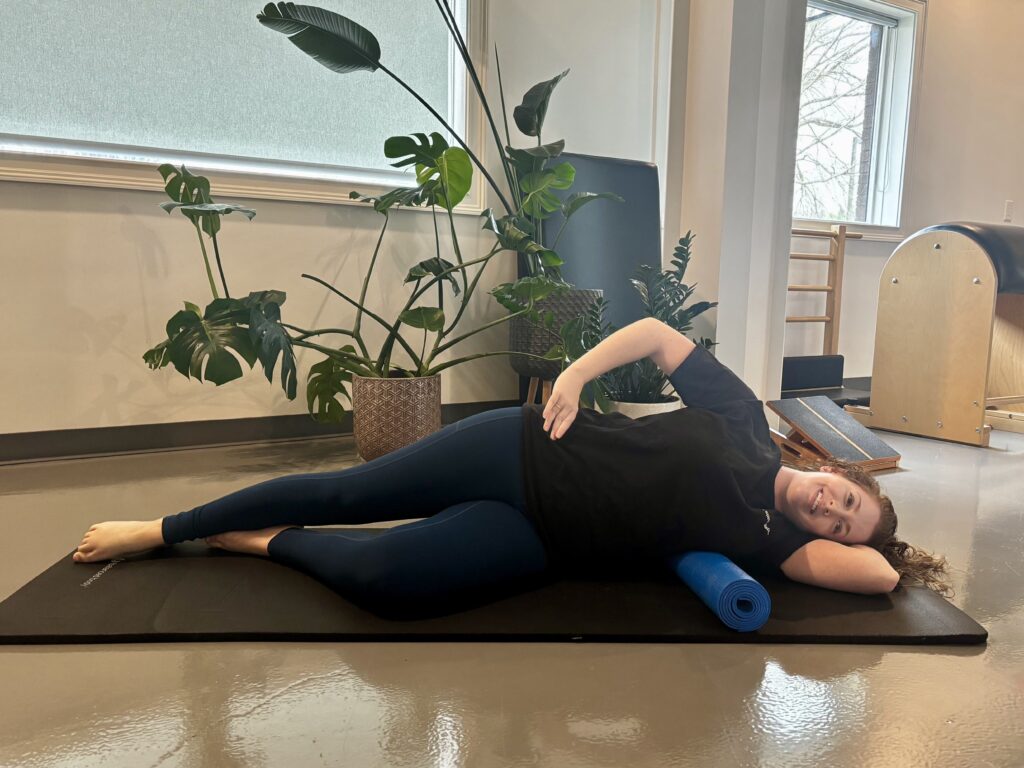
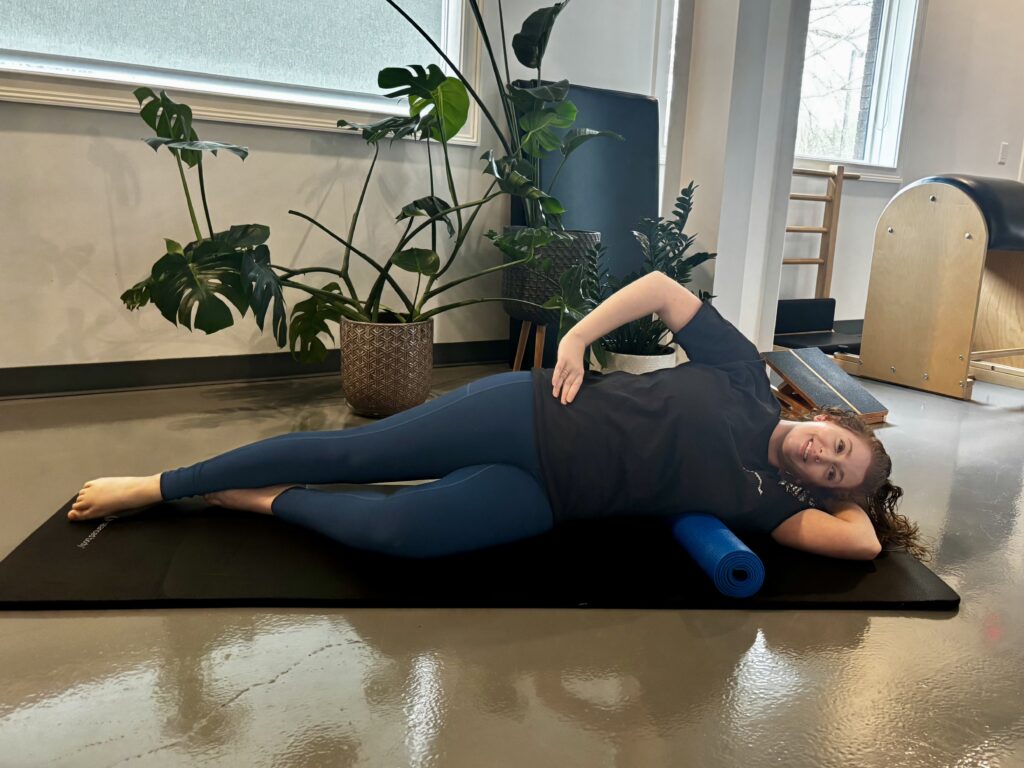
These pictures are of the side shift while side-lying on my thoracic convex side. Notice that I don’t get a gigantic range of motion here because I’m already side shifted out of my scoli by the pad.
Note: If you’re unsure where your pads go, we have a helpful blog post here, a great video here, and another video here. If you still need assistance, book a lesson in person or virtually with one of us here.
The Results
Group 1 had an average Cobb angle drop from 31.5 degrees to 30.3 degrees over an average of 4.2 years. Remember, these patients were not braced, were skeletally mature the entire time, and were not doing anything other than the side shift, hitch, and hitch-shift exercises assigned to them. That’s pretty phenomenal to stabilize without anything else helping out. The researchers cited statistics of the watch and wait method, and with similar Cobb angles between 0.25-0.36 progressions annually was expected. Group 1 decreased 0.29 annually.
Group 2 had an average Cobb angle of 37.1 at the start of the treatment and increased to an average 45.4 degrees after an average of 2.8 years. Researchers stated that 28 patients (72%) had a Cobb angle that ranged from 10 degrees below (27.1 degrees) to 10 degrees (47.1 degrees) above the starting Cobb angle. 11 patients (28%) saw an increase of 10 degrees or more. There are a multitude of reasons for Group 2 to not have been as wildly successful as Group 1:
- They were still growing, and hormones are a large factor in idiopathic scoli.
- Females in the study had yet to begin menstruation, and, again, hormones are a large factor in idiopathic scoli.
- The type of brace was not noted. There’s no way to know if the braces worn were making the patients’ scoli better or worse.
- The amount of time patients spent in their braces is unkown. If they were spending 23 hours a day in a brace and doing 10 minutes of side shifting alone, their spines would not be very mobile; there is a load of research that says rigid spines have difficulty decreasing Cobb angles and rotation.
The Conclusions
The 1999 Netherlands study I mentioned earlier states, “In our opinion the exact mechanism of side shift therapy is still unknown.” However, they still found the side shift a worthwhile treatment for those with idiopathic scoli. Maruyama and his team don’t even attempt to understand what is happening at the muscular level with the side shift exercise; this is evident to me because the hitch and hitch-shift exercises are asking for muscle spasms to happen. Drs. Maruyama, Takeshita, and Kitagawa fall into a long line of doctors attempting to get the Cobb angle as close to zero as possible without a care to patients’ quality of life.
We know that muscles pull on bones. That’s their only job in life. When we have idiopathic scoli, some muscles like to pull more than others. Spinal translation or side shifting works the sleepier muscles on the concave side of your curve while elongating them. That’s the not-so-secret “mechanism” of the side shift.
The quick take aways from Drs. Maruyama, Takeshita, and Kitagawa’s research are:
- The side shift exercise is a fabulous exercise to add to your daily life if they’re accessible and a good choice for your body no matter your age.
- The hitch exercise might decrease your Cobb angle but might not feel great.
- The hitch-shift exercise has been debunked by a 2016 Brazillian study, and I wouldn’t waste my time on it.
While the side shift is an amazing exercise that I teach multiple times a day and have been doing myself while I’m sitting at my desk typing this analysis, it is not going to magically fix your scoliosis. I think Group 2’s results make this very obvious. I am the side shift’s biggest fan, but I don’t want you to only do the side shift.
Add the side shift exercise to what you’re already doing, don’t erase and replace. The side shift is one of the easiest exercises to do anywhere as you don’t need equipment. However, you can use equipment to do the side shift; I teach the side shift on every single piece of equipment at Spiral Spine. My favorite pieces of Pilates equipment to teach the side shift on are the Ladder Barrel, Arc, and Chair (see image below).

References
- Mehta MH (1985) Active correction by side-shift: an alternative treatment for early idiopathic scoliosis. In: Warner JO, Mehta MH (eds) Scoliosis prevention. Proceedings of the P. Zorab scoliosis symposium 1983: Praeger, New York pp 126–140.
- van Limbeek, J. (1999). Treatment of idiopathic scoliosis with side-shift therapy: an initial comparison with a brace treatment historical cohort. European Spine Journal. https://www.academia.edu/27854550/Treatment_of_idiopathic_scoliosis_with_side_shift_therapy_an_initial_comparison_with_a_brace_treatment_historical_cohort
- Maruyama, T. Side-shift exercise and hitch exercise. Studies in Health Technology and Informatics. https://www.academia.edu/16613247/Side_shift_exercise_and_hitch_exercise
- Oliveira, Crystian & Fregonesi, Cristina & Pachioni, Célia & Masselli, Maria & Ferreira, Dalva. (2016). Influence of side-shift therapy associated or not with a shoe lift on idiopathic scoliosis. Fisioterapia em Movimento. 29. 121-130. 10.1590/0103-5150.029.001.AO13. https://www.researchgate.net/publication/300497308_Influence_of_side-shift_therapy_associated_or_not_with_a_shoe_lift_on_idiopathic_scoliosis

Jennifer Stark is a Nationally Certified Pilates Teacher, Certified Integrated Movement Specialist, Certified Kinesiology Taping Practitioner, and Spiral Spine’s side shift aficionado. Jennifer has worked alongside Erin Myers on multiple scoliosis education endeavors including Analyzing Scoliosis, I Have Scoliosis; Now What?, and the Scoliosis Retreat which is held regularly at Spiral Spine Pilates.
4 Responses
Hi Jennifer, thanks for the reinforcement video. In addition to the left foot shoe pad, I’m doing something similar in the larger Target bathroom, on break and lunch, to get me through the 8 hour shift. I’m left hand holding a purse hook on door, stretching the right hand up the wall, high as I can go, typewriting my waist 6″ back and forth 6 times about 3 times per 8 hour shift. I’m also doing the Sarah floor moves, to realign my spine. Many times I fall asleep, I’m so much more comfortable. Thanks again for the info and comparisons.
Hey Joani!
I’m delighted to hear that the exercises Sarah and I provided have helped! Keep up the great work!
If you have a rod are you able to do the exercises?
Hello Ann,
It is entirely dependent upon your rods’ location. I have some clients who are only partially fused and can mobilize the non-fused vertebrae. I would suggest booking a lesson with one of us to discuss the options for those with rods. For my fully fused clients, I use a tilt exercise that does not mobilize the spine, engaging some of the same muscles.